
持っているカードを確認
Understanding how to display cards
Open the "CardTest" scene in Unity. You will see the following:
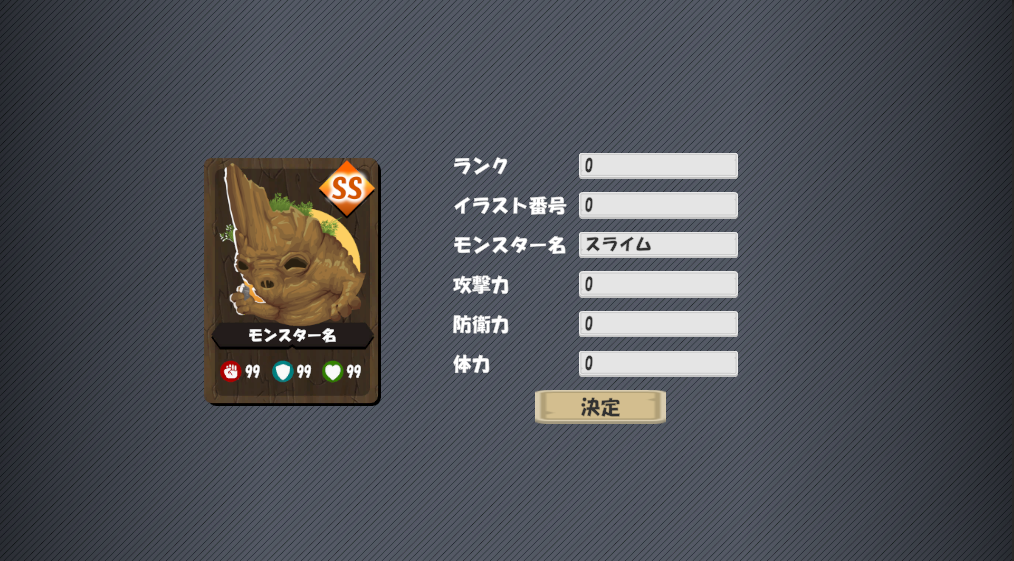
We can use this scene to test our card display functions. These are the following values:
- ランク:A value between 0 and 4, that correspond to C, B, A, S and SS in that order
- イラスト番号:A value between 0 and 9 to select the illustration in the center
- モンスター名:The name of the monster to display
- 攻撃力、防衛力、体力:Attack, defense and Hit Point values, between 0 and 99
This is all processed by the CardDisplay class. In particular the SetData method shown below:
// データを設定し、カードを更新
public void SetData(CardDisplayData data)
{
    // スプライトを読み込む
    cardRank.sprite = CardResources.GetRankSprite(data.rank);
    monsterPicture.sprite = CardResources.GetMonsterSprite(data.pictureID);

    // テキストを更新
    monsterName.text = data.monsterName;
    atkValue.text = data.atkValue.ToString();
    defValue.text = data.defValue.ToString();
    hpValue.text = data.hpValue.ToString();
}
Here, CardDisplayData is the data required to update the card
public struct CardDisplayData
{
    public int rank;           // ランク(0:C -> 4:SS)
    public int pictureID;      // 画像番号 (0~9)
    public string monsterName; // モンスター名
    public int atkValue;       // 攻撃力
    public int defValue;       // 防衛力
    public int hpValue;        // 体力
}
Creating the database
The list of all cards
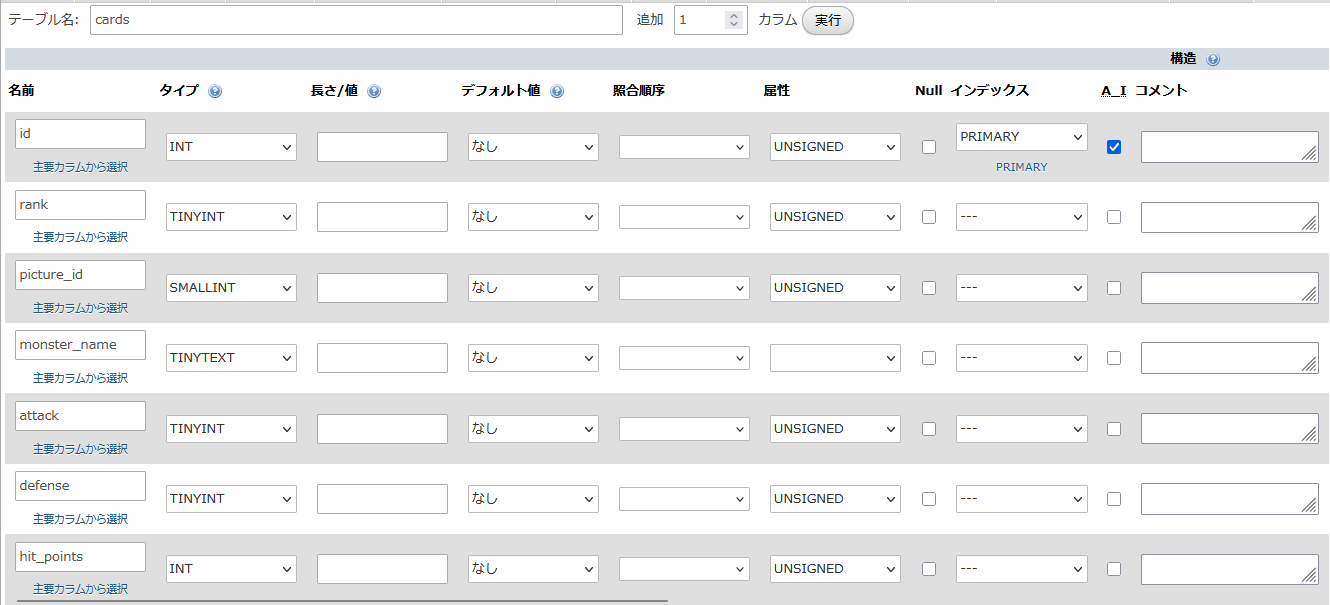
We can use this knowledge to create a new table for the database to hold all the cards in our game. Let's open phpMyAdmin again and create a new table named "cards" with the required columns as shown below:
And add a few cards to the database:
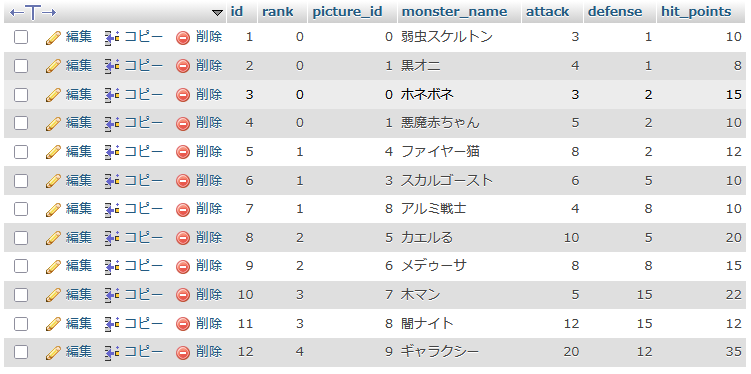
You can use this SQL statement to insert some cards, or you can make your own.
INSERT INTO `cards` (`id`, `rank`, `picture_id`, `monster_name`, `attack`, `defense`, `hit_points`) VALUES
(1, 0, 0, '弱虫スケルトン', 3, 1, 10),
(2, 0, 1, '黒オニ', 4, 1, 8),
(3, 0, 0, 'ホネボネ', 3, 2, 15),
(4, 0, 1, '悪魔赤ちゃん', 5, 2, 10),
(5, 1, 4, 'ファイヤー猫', 8, 2, 12),
(6, 1, 3, 'スカルゴースト', 6, 5, 10),
(7, 1, 8, 'アルミ戦士', 4, 8, 10),
(8, 2, 5, 'カエルる', 10, 5, 20),
(9, 2, 6, 'メデゥーサ', 8, 8, 15),
(10, 3, 7, '木マン', 5, 15, 22),
(11, 3, 8, '闇ナイト', 12, 15, 12),
(12, 4, 9, 'ギャラクシー', 20, 12, 35);
The list of cards owned by a player
Since different players will have different cards, we need to create a relationship between the table 'users' and the table 'cards'. We can do this by creating a new table called 'user_cards' which will connect the two in a very simple manner:
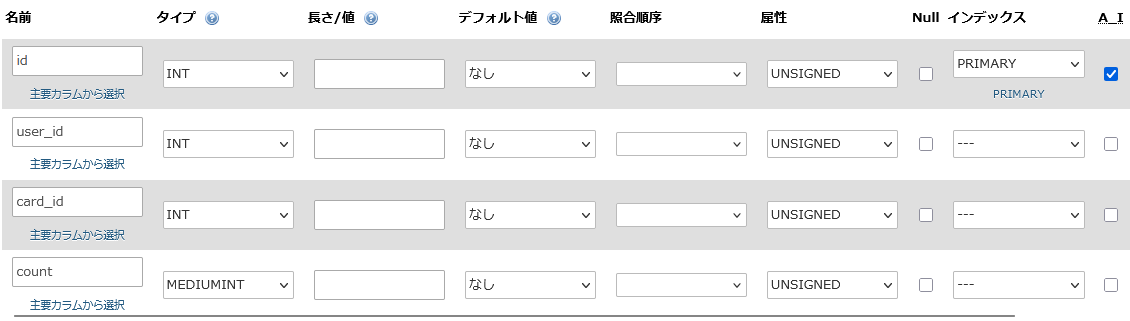
As you can see, the table only has 4 columns: A record id, the user id, the card id and how many copies of that card the player has. We already have some test users and some cards, so let's give them some cards to each player. You can add them by hand or use the SQL statement below to quickly get some initial cards working.
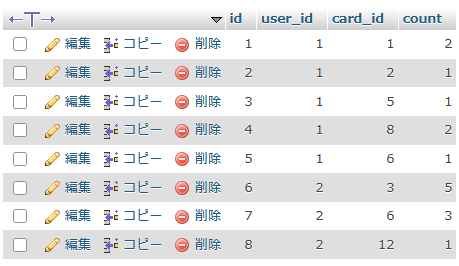
INSERT INTO `user_cards` (`id`, `user_id`, `card_id`, `count`) VALUES
(1, 1, 1, 2), (2, 1, 2, 1), (3, 1, 5, 1),(4, 1, 8, 2),
(5, 1, 6, 1), (6, 2, 3, 5), (7, 2, 6, 3),(8, 2, 12, 1);
Implementing the API
We have our tables with some test data. Now we can build our PHP script to return the cards owned by a player. Since the Unity code expect us to give it detailed card information, we need to send all everything (rank, picture id, monster name and card values). At the same time, we don't want to duplicate data, so we're going to send the card count too. The final JSON should look something like this:
{
  "playerCards" : [
    {
      "card" : {
        "rank" : 0,
        "pictureID" : 0,
        "monsterName" : "弱虫スケルトン",
        "atkValue" : 3,
        "defValue" : 1,
        "hpValue" : 10
      },
      "count" : 2
    },
    ...
  ]
}
PHP スクリプト
First we're going to query the database. We expect to receive the user id as a parameter and then we'll search for all the cards that user has. If it has no card, or the user does not exist, we return an empty array.
For testing, we'll pass the user id as a GET parameter and change it to POST in the final version. Create a get_player_cards.php file and implement the following:
<?php
	// JSONを返すべき
	header("Content-Type: application/json; charset=utf-8");

	// 接続
	$dbh = new PDO('mysql:host=localhost; dbname=card_game', "root", "", [PDO::ATTR_PERSISTENT => true]);

	// ユーザーIDを取得
	$user_id = $_GET['user_id'];

	// そのユーザーを持っているカードを検索
	$sql = sprintf("SELECT * FROM user_cards WHERE user_id = '%s'", $user_id);
	$result = $dbh->query($sql);

	// 返すデータを準備する
	$json["playerCards"] = [];

	while ($record = $result->fetch())
	{
		// カード1枚に関するデータ
		$card_data['card_id'] = $record['card_id'];
		$card_data['count'] = $record['count'];

		// 結果に追加
		array_push($json["playerCards"], $card_data);
	}

	print(json_encode($json));
?>
here we take the user id and search for all the cards that user has and return it. But as we can see from our test:
SELECT * FROM user_cards, cards WHERE user_id = 1 AND user_cards.card_id = cards.id;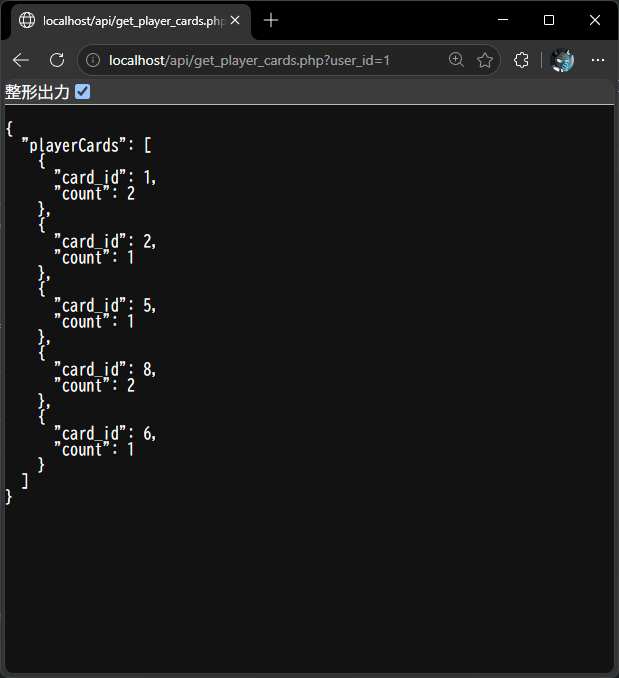
It returns the id of the card, not the detailed information. In order to get the data we need in Unity, we need to merge two tables and search at once. This is called a JOIN operation. Let's test it first in phpMyAdmin. We start with the following SQL query:
SELECT * FROM user_cards WHERE user_id = 1;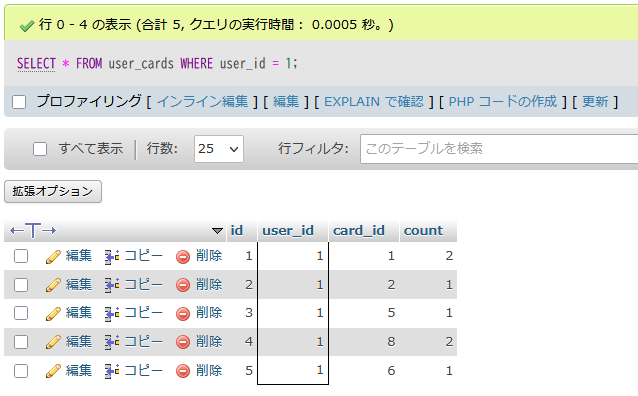
Which is the same to our PHP result. Now, let's merge the cards table and add the condition that the card_id must match the same id in the cards table. That is:
SELECT * FROM user_cards, cards WHERE user_id = 1 AND user_cards.card_id = cards.id;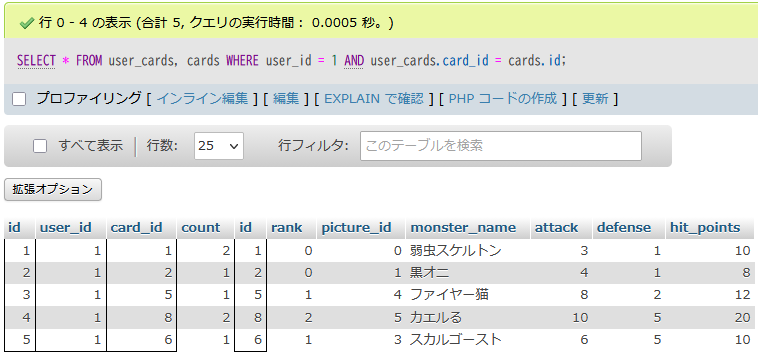
Perfect! We have now detailed card information for all the cards that belong to user_id = 1. We can go ahead and modify our PHP script to use the improved SQL query and return the result we need.
<?php
	// JSONを返すべき
	header("Content-Type: application/json; charset=utf-8");

	// 接続
	$dbh = new PDO('mysql:host=localhost; dbname=card_game', "root", "", [PDO::ATTR_PERSISTENT => true]);

	// ユーザーIDを取得
	$user_id = $_GET['user_id'];

	// そのユーザーを持っているカードを検索
	$sql = sprintf("SELECT * FROM user_cards, cards WHERE user_id = '%s' AND user_cards.card_id = cards.id", $user_id);
	$result = $dbh->query($sql);

	// 返すデータを準備する
	$json["playerCards"] = [];

	while ($record = $result->fetch())
	{
		// カード1枚に関するデータ(Unityの構造体に合わせる)
		$card_data['card']['rank']        = $record['rank'];
		$card_data['card']['pictureID']   = $record['picture_id'];
		$card_data['card']['monsterName'] = $record['monster_name'];
		$card_data['card']['atkValue']    = $record['attack'];
		$card_data['card']['defValue']    = $record['defense'];
		$card_data['card']['hpValue']     = $record['hit_points'];

		$card_data['count'] = $record['count'];

		// 結果に追加
		array_push($json["playerCards"], $card_data);
	}

	print(json_encode($json));
?>
running the test again, we get:
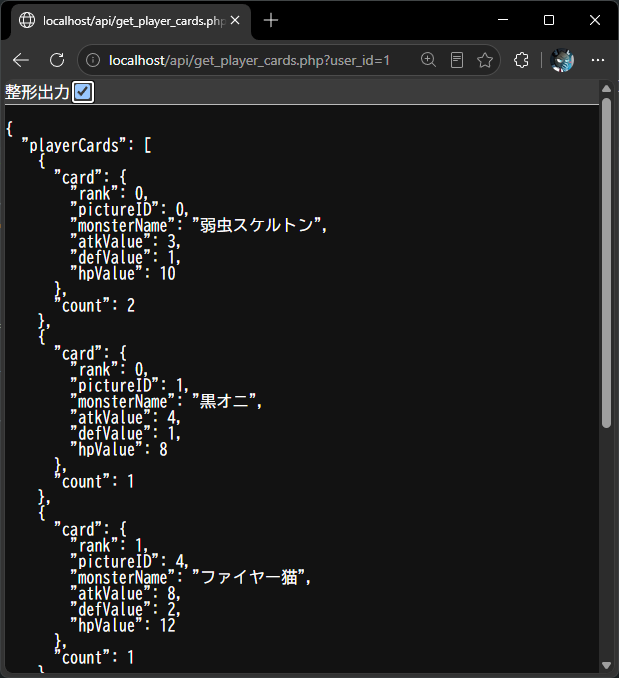
which is the JSON format we wanted to get. All that is left is change $_GET to $_POST in the script and we're ready for the next step.
Unityを使い、APIとの接続
Lets update our APIRequest class and add a new method that access get_player_cards.php, and converts it into something we can use. First, we add the necessary structures:
// 所有カードを求める結果
[Serializable]
public struct PlayerCard
{
    public CardDisplayData card;
    public int count;
}

[Serializable]
public struct PlayerCardResponse
{
    public PlayerCard[] playerCards;
}
And then we add the request method:
// プレーヤーが所有しているカードを求める
// userID:ユーザーID
// 戻り値:PlayerCardのリスト
public static async Awaitable<PlayerCardResponse> GetPlayerCards(string userID)
{
    // POSTでデータを準備
    var postData = new WWWForm();
    postData.AddField("user_id", userID);

    // APIのURLへリクエストを送信
    const string url = ServerAPI + "/get_player_cards.php";
    var webRequest = UnityWebRequest.Post(url, postData);

    // 返事を待機する
    await webRequest.SendWebRequest();

    // 返事の文字列を取得
    var webResponse = webRequest.downloadHandler.text;

    // JSONからPlayerCardの配列へ変換
    PlayerCardResponse response = JsonUtility.FromJson<PlayerCardResponse>(webResponse);

    // 返す
    return response;
}
Requesting for our user
Since we stored the user ID in LoginController.UserID, we can request the server to fetch all the cards for our player. First let's take a look at CardListController
// カード一覧を管理する
public class CardListController : MonoBehaviour
{
// 画面のアニメーション
[SerializeField] private ScreenSlide screenSlide;

// 戻るボタン
[SerializeField] private Button backButton;

// 戻るボタン
[SerializeField] private Button deleteButton;

// カード一覧のグリッド
[SerializeField] private GridLayoutGroup cardsList;

// カードのプレハブ
[SerializeField] private CardDisplay cardPrefab;

// 画面を表示する
public void Show()
{
    screenSlide.Show();
    _ = LoadCardsAsync();
}

// 選択されたカードを削除
private void DeleteSelectedCards()
{
    // 未実装
}

// カードを読み込み、画面に追加し、表示する
private async Awaitable LoadCardsAsync()
{
    // すべてのカード一を削除する
    foreach (Transform child in cardsList.transform)
        Destroy(child.gameObject);

    await Awaitable.NextFrameAsync();

    // オンライン機能を実装する前、いくつかのカード手動に追加
    var cards = new CardDisplayData[]
    {
        new()
        {
            rank = 0, pictureID = 0,
            monsterName = "テストモンスターA",
            atkValue = 10, defValue = 10, hpValue = 10
        },
        new()
        {
            rank = 0, pictureID = 1,
            monsterName = "テストモンスターB",
            atkValue = 20, defValue = 20, hpValue = 20
        },
        new()
        {
            rank = 1, pictureID = 2,
            monsterName = "テストモンスターC",
            atkValue = 20, defValue = 20, hpValue = 20
        },
        new()
        {
            rank = 1, pictureID = 2,
            monsterName = "テストモンスターC",
            atkValue = 20, defValue = 20, hpValue = 20
        },
    };

    foreach (var card in cards)
    {
        var copy = Instantiate(cardPrefab, cardsList.transform);
        copy.SetData(card);
        copy.SetSelectable(true);
    }
}

private void OnEnable()
{
    backButton.onClick.AddListener(()=>screenSlide.Hide());
    deleteButton.onClick.AddListener(DeleteSelectedCards);
}

private void OnDisable()
{
    backButton.onClick.RemoveAllListeners();
}
This is a very simple script. It clears any cards showing on the screen, and then loads some test cards. The 「削除」button does nothing right now, and the 「戻る」button takes us back to the top menu.
To use our API, all we have to do is replace the offline test cards and request cards from the Server. Since we already have our APIRequest method, let's use it here.
// カードを読み込み、画面に追加し、表示する
private async Awaitable LoadCardsAsync()
{
    // すべてのカード一を削除する
    foreach (Transform child in cardsList.transform)
        Destroy(child.gameObject);

    // サーバーにカードの一覧を要求
    var cards = await APIRequest.GetPlayerCards(LoginController.UserID);

    // 1枚ずつを追加
    foreach (var item in cards.playerCards)
    {
        for (var i = 0; i < item.count; i++)
        {
            var copy = Instantiate(cardPrefab, cardsList.transform);
            copy.SetData(item.card);
            copy.SetSelectable(true);
        }
    }
}
Let's login again and try loading the player cards:
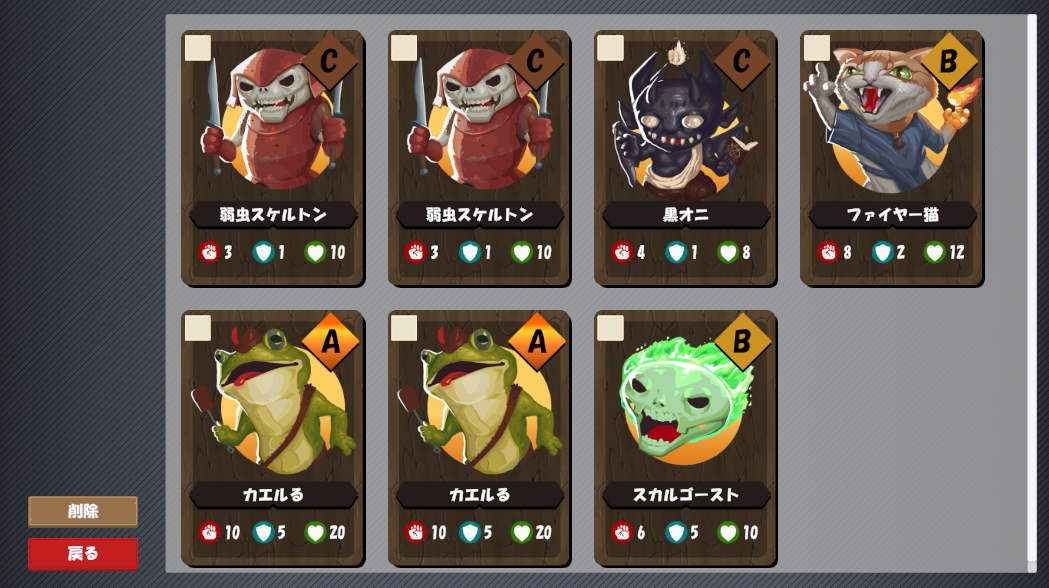
These are the cards we stored in the database!