
持っているカードを確認
Understanding how to display cardsカードの表示方法を理解する
Open the "CardTest" scene in Unity. You will see the following:Unityで「CardTest」シーンを開く。以下のような画面が表示される。
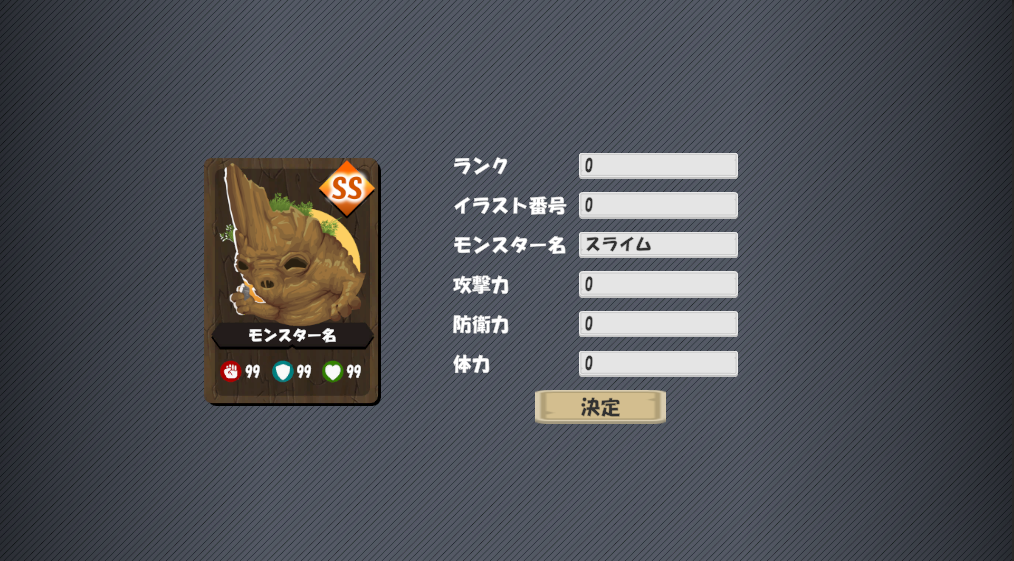
We can use this scene to test our card display functions. These are the following values:このシーンを使って、カード表示機能をテストできる。使用する値は次の通りである。
- ランク:
A value between 0 and 4, that correspond to C, B, A, S and SS in that order0〜4の値で、それぞれC、B、A、S、SSに対応する - イラスト番号:
A value between 0 and 9 to select the illustration in the center中央のイラストを選択するための0〜9の値 - モンスター名:
The name of the monster to display表示するモンスターの名前 - 攻撃力、防衛力、体力:
Attack, defense and Hit Point values, between 0 and 990〜99の攻撃力、防衛力、体力の値
Thisこれらはすべて isCardDisplay allクラスによって処理される。特に、以下に示す processedSetData by the CardDisplay class. In particular the SetData method shown below:メソッドで扱われる。
// データを設定し、カードを更新
public void SetData(CardDisplayData data)
{
    // スプライトを読み込む
    cardRank.sprite = CardResources.GetRankSprite(data.rank);
    monsterPicture.sprite = CardResources.GetMonsterSprite(data.pictureID);

    // テキストを更新
    monsterName.text = data.monsterName;
    atkValue.text = data.atkValue.ToString();
    defValue.text = data.defValue.ToString();
    hpValue.text = data.hpValue.ToString();
}Here,ここで、CardDisplayData CardDisplayData is the data required to update the cardはカードを更新するために必要なデータである。
public struct CardDisplayData
{
    public int rank;           // ランク(0:C -> 4:SS)
    public int pictureID;      // 画像番号 (0~9)
    public string monsterName; // モンスター名
    public int atkValue;       // 攻撃力
    public int defValue;       // 防衛力
    public int hpValue;        // 体力
}
Creating the databaseデータベースを作成する
The list of all cards全カードの一覧
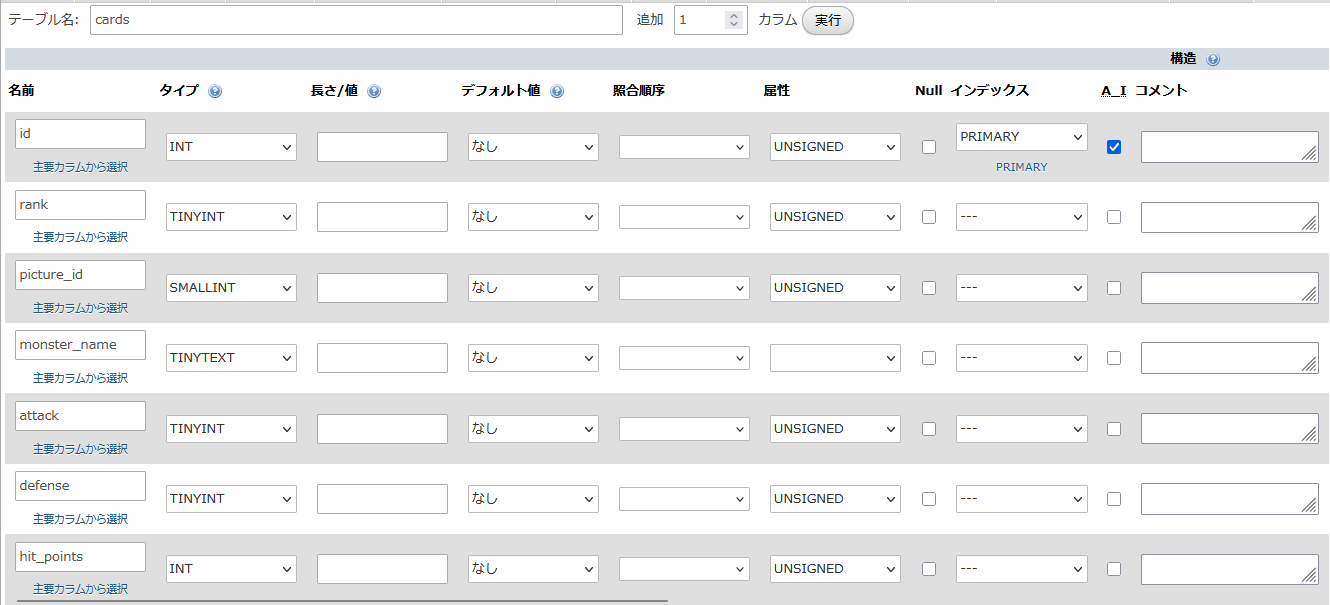
We can use this knowledge to create a new table for the database to hold all the cards in our game. Let's open この知識を使って、ゲーム内の全カードを保存するための新しいテーブルをデータベースに作成しよう。phpMyAdmin again and create a new table named "cards" with the required columns as shown below:をもう一度開き、以下のように必要なカラムを持つ「cards」という名前のテーブルを作成しよう。
And add a few cards to the database:そして、データベースにいくつかカードを追加しよう。
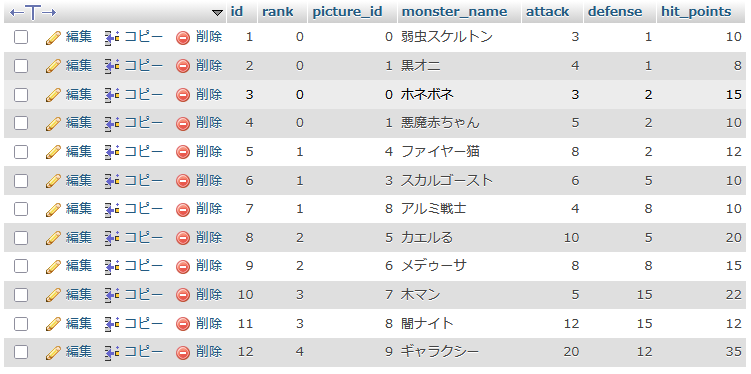
You can use this SQL statement to insert some cards, or you can make your own.以下のSQL文を使ってカードを挿入してもいいし、自分で作ってもよい。
INSERT INTO `cards` (`id`, `rank`, `picture_id`, `monster_name`, `attack`, `defense`, `hit_points`) VALUES
(1, 0, 0, '弱虫スケルトン', 3, 1, 10),
(2, 0, 1, '黒オニ', 4, 1, 8),
(3, 0, 0, 'ホネボネ', 3, 2, 15),
(4, 0, 1, '悪魔赤ちゃん', 5, 2, 10),
(5, 1, 4, 'ファイヤー猫', 8, 2, 12),
(6, 1, 3, 'スカルゴースト', 6, 5, 10),
(7, 1, 8, 'アルミ戦士', 4, 8, 10),
(8, 2, 5, 'カエルる', 10, 5, 20),
(9, 2, 6, 'メデゥーサ', 8, 8, 15),
(10, 3, 7, '木マン', 5, 15, 22),
(11, 3, 8, '闇ナイト', 12, 15, 12),
(12, 4, 9, 'ギャラクシー', 20, 12, 35);
The list of cards owned by a playerプレイヤーが所有するカードの一覧
Since different players will have different cards, we need to create a relationship between the table 'users' and the table 'cards'. We can do this by creating a new table called 'user_cards' which will connect the two in a very simple manner:プレイヤーごとに持っているカードが異なるため、「users」テーブルと「cards」テーブルの間に関係を作る必要がある。これは、この2つを単純な形でつなぐ「user_cards」という新しいテーブルを作成することで実現できる。
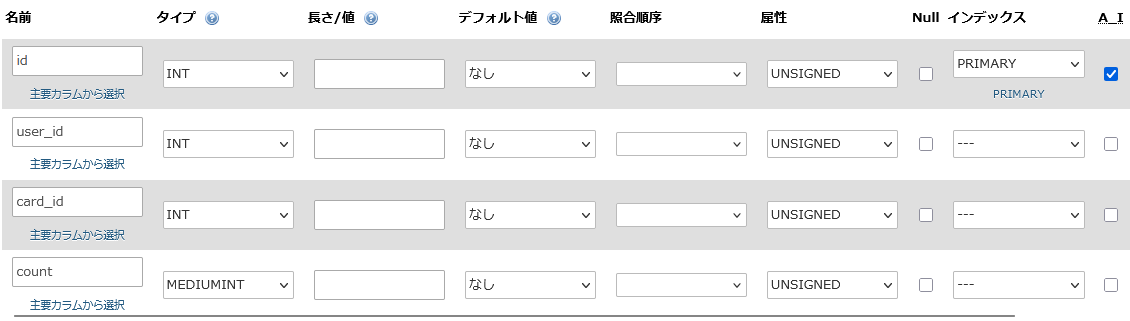
As you can see, the table only has 4 columns: A record id, the user id, the card id and how many copies of that card the player has. We already have some test users and some cards, so let's give them some cards to each player. You can add them by hand or use the SQL statement below to quickly get some initial cards working. 見ての通り、このテーブルにはレコードID、ユーザーID、カードID、そのカードの所持枚数という4つのカラムしかない。テストユーザーとカードはすでに用意してあるので、それぞれのプレイヤーにカードを持たせよう。手動で追加してもいいし、以下のSQL文を使って手早く初期カードを用意してもよい。
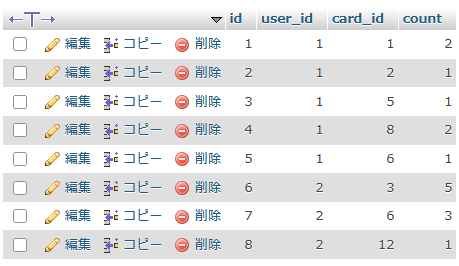
INSERT INTO `user_cards` (`id`, `user_id`, `card_id`, `count`) VALUES
(1, 1, 1, 2), (2, 1, 2, 1), (3, 1, 5, 1),(4, 1, 8, 2),
(5, 1, 6, 1), (6, 2, 3, 5), (7, 2, 6, 3),(8, 2, 12, 1);
Implementing the APIAPIを実装する
We have our tables with some test data. Now we can build our PHP script to return the cards owned by a player. Since the Unity code expect us to give it detailed card information, we need to send all everything (rank, picture id, monster name and card values). At the same time, we don't want to duplicate data, so we're going to send the card count too. The final JSON should look something like this:テーブルとテストデータが揃った。次は、プレイヤーが所有するカードを返すPHPスクリプトを作る。Unity側のコードは詳細なカード情報を必要とするため、ランク、イラスト番号、モンスター名、各種数値などすべてを送る必要がある。ただし、データを重複させたくないので、カードの枚数も一緒に送ることにする。最終的なJSONは次のような形になる
{
  "playerCards" : [
    {
      "card" : {
        "rank" : 0,
        "pictureID" : 0,
        "monsterName" : "弱虫スケルトン",
        "atkValue" : 3,
        "defValue" : 1,
        "hpValue" : 10
      },
      "count" : 2
    },
    ...
  ]
}
PHP スクリプト
First we're going to query the database. We expect to receive the user id as a parameter and then we'll search for all the cards that user has. If it has no card, or the user does not exist, we return an empty array.まず、データベースにクエリを送る。パラメータとしてユーザーIDを受け取り、そのユーザーが持っているすべてのカードを検索する。カードを持っていない場合や、ユーザーが存在しない場合は、空の配列を返す。
For testing, we'll pass the user id as a テスト用として、ユーザーIDはGETパラメータで渡し、最終版では parameter and change it to POSTに変更する。 in the final version. Create a get_player_cards.php file and implement the following:ファイルを作成し、以下のように実装しよう。
<?php
	// JSONを返すべき
	header("Content-Type: application/json; charset=utf-8");

	// 接続
	$dbh = new PDO('mysql:host=localhost; dbname=card_game', "root", "", [PDO::ATTR_PERSISTENT => true]);

	// ユーザーIDを取得
	$user_id = $_GET['user_id'];

	// そのユーザーを持っているカードを検索
	$sql = sprintf("SELECT * FROM user_cards WHERE user_id = '%s'", $user_id);
	$result = $dbh->query($sql);

	// 返すデータを準備する
	$json["playerCards"] = [];

	while ($record = $result->fetch())
	{
		// カード1枚に関するデータ
		$card_data['card_id'] = $record['card_id'];
		$card_data['count'] = $record['count'];

		// 結果に追加
		array_push($json["playerCards"], $card_data);
	}

	print(json_encode($json));
?>
here we take the user id and search for all the cards that user has and return it. But as we can see from our test:ここでは、ユーザーIDを受け取り、そのユーザーが持っているすべてのカードを検索して返している。しかし、以下のテストからわかるように、
SELECT * FROM user_cards, cards WHERE user_id = 1 AND user_cards.card_id = cards.id;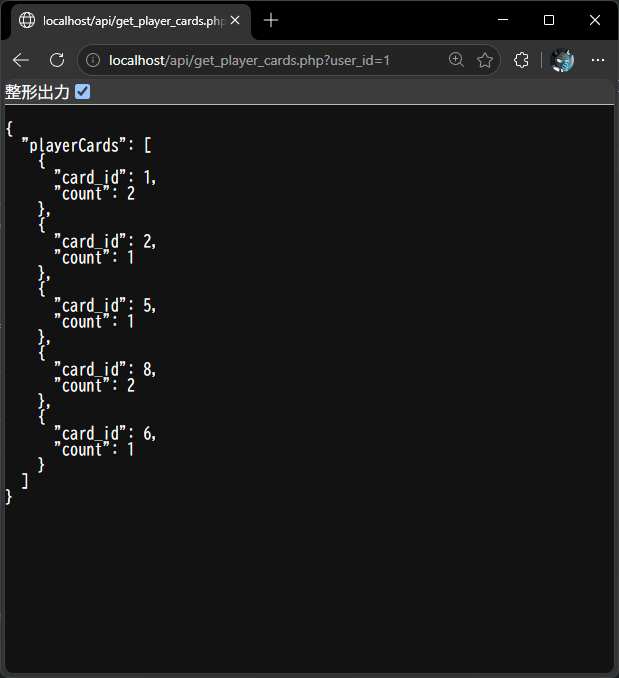
Itこれはカードの詳細情報ではなく、カードのIDを返しているだけである。Unityで必要なデータを取得するには、2つのテーブルを結合して同時に検索する必要がある。これはJOIN操作と呼ばれる。まずは returnsphpMyAdmin the id of the card, not the detailed information. In order to get the data we need in Unity, we need to merge two tables and search at once. This is called a JOIN operation. Let's test it first in phpMyAdmin. We start with the following SQL query:でテストしてみよう。以下のSQLクエリから始める。
SELECT * FROM user_cards WHERE user_id = 1;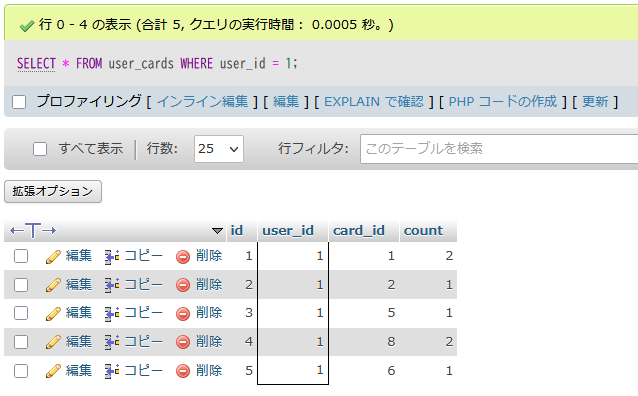
Which is the same to our PHP result. Now, let's merge the cards table and add the condition that the card_id must match the same id in the cards table. That is:これはPHPの結果と同じである。次に、cardsテーブルを結合し、card_idがcardsテーブルの同じidと一致するという条件を追加しよう。つまり、
SELECT * FROM user_cards, cards WHERE user_id = 1 AND user_cards.card_id = cards.id;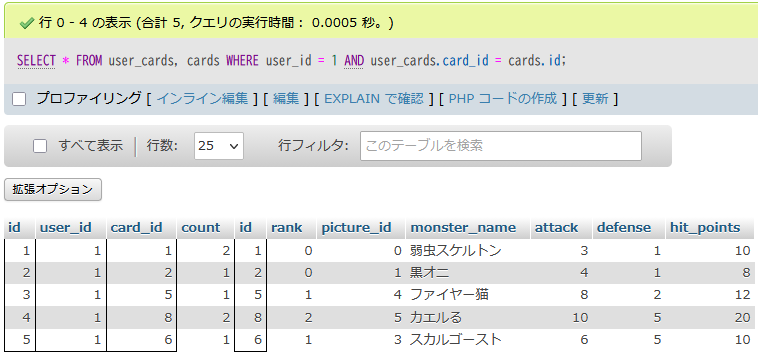
Perfect! We have now detailed card information for all the cards that belong to 完璧である!これで、user_id = 1.1 We can go ahead and modify our PHP script to use the improved SQL query and return the result we need.が持つすべてのカードについて、詳細な情報が得られた。改良したSQLクエリを使うようにPHPスクリプトを修正し、必要な結果を返すようにしよう。
<?php
	// JSONを返すべき
	header("Content-Type: application/json; charset=utf-8");

	// 接続
	$dbh = new PDO('mysql:host=localhost; dbname=card_game', "root", "", [PDO::ATTR_PERSISTENT => true]);

	// ユーザーIDを取得
	$user_id = $_GET['user_id'];

	// そのユーザーを持っているカードを検索
	$sql = sprintf("SELECT * FROM user_cards, cards WHERE user_id = '%s' AND user_cards.card_id = cards.id", $user_id);
	$result = $dbh->query($sql);

	// 返すデータを準備する
	$json["playerCards"] = [];

	while ($record = $result->fetch())
	{
		// カード1枚に関するデータ(Unityの構造体に合わせる)
		$card_data['card']['rank']        = $record['rank'];
		$card_data['card']['pictureID']   = $record['picture_id'];
		$card_data['card']['monsterName'] = $record['monster_name'];
		$card_data['card']['atkValue']    = $record['attack'];
		$card_data['card']['defValue']    = $record['defense'];
		$card_data['card']['hpValue']     = $record['hit_points'];

		$card_data['count'] = $record['count'];

		// 結果に追加
		array_push($json["playerCards"], $card_data);
	}

	print(json_encode($json));
?>
running the test again, we get:もう一度テストを実行すると、以下のようになる。
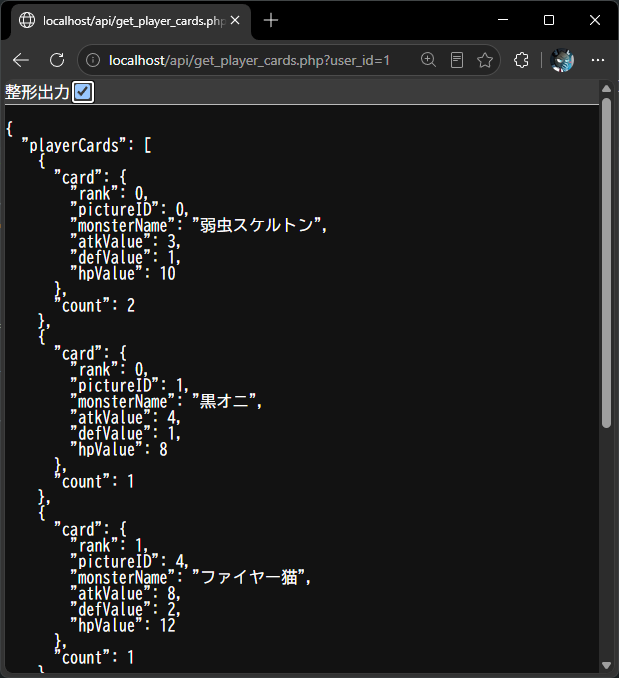
which is the JSON format we wanted to get. All that is left is changeこれは、求めていたJSON形式である。あとはスクリプト内の $_GET toを $_POST in the script and we're ready for the next step.に変更すれば、次のステップに進む準備は完了である。
Unityを使い、APIとの接続
LetsAPIRequest updateクラスを更新し、get_player_cards.php our APIRequest class and add a new method that access get_player_cards.php, and converts it into something we can use. First, we add the necessary structures:にアクセスして、使える形に変換する新しいメソッドを追加しよう。まず、必要な構造体を追加する。
// 所有カードを求める結果
[Serializable]
public struct PlayerCard
{
    public CardDisplayData card;
    public int count;
}

[Serializable]
public struct PlayerCardResponse
{
    public PlayerCard[] playerCards;
}
And then we add the request method:続いて、リクエスト用のメソッドを追加する。
// プレーヤーが所有しているカードを求める
// userID:ユーザーID
// 戻り値:PlayerCardのリスト
public static async Awaitable<PlayerCardResponse> GetPlayerCards(string userID)
{
    // POSTでデータを準備
    var postData = new WWWForm();
    postData.AddField("user_id", userID);

    // APIのURLへリクエストを送信
    const string url = ServerAPI + "/get_player_cards.php";
    var webRequest = UnityWebRequest.Post(url, postData);

    // 返事を待機する
    await webRequest.SendWebRequest();

    // 返事の文字列を取得
    var webResponse = webRequest.downloadHandler.text;

    // JSONからPlayerCardの配列へ変換
    PlayerCardResponse response = JsonUtility.FromJson<PlayerCardResponse>(webResponse);

    // 返す
    return response;
}
Requesting for our user自分のユーザーで試してみる
SinceユーザーIDは weLoginController.UserID storedに保存してあるので、サーバーに対してプレイヤーの全カードを取得するようリクエストできる。まずは theCardListController user ID in LoginController.UserID, we can request the server to fetch all the cards for our player. First let's take a look at CardListControllerを見てみよう。
// カード一覧を管理する
public class CardListController : MonoBehaviour
{
// 画面のアニメーション
[SerializeField] private ScreenSlide screenSlide;

// 戻るボタン
[SerializeField] private Button backButton;

// 戻るボタン
[SerializeField] private Button deleteButton;

// カード一覧のグリッド
[SerializeField] private GridLayoutGroup cardsList;

// カードのプレハブ
[SerializeField] private CardDisplay cardPrefab;

// 画面を表示する
public void Show()
{
    screenSlide.Show();
    _ = LoadCardsAsync();
}

// 選択されたカードを削除
private void DeleteSelectedCards()
{
    // 未実装
}

// カードを読み込み、画面に追加し、表示する
private async Awaitable LoadCardsAsync()
{
    // すべてのカード一を削除する
    foreach (Transform child in cardsList.transform)
        Destroy(child.gameObject);

    await Awaitable.NextFrameAsync();

    // オンライン機能を実装する前、いくつかのカード手動に追加
    var cards = new CardDisplayData[]
    {
        new()
        {
            rank = 0, pictureID = 0,
            monsterName = "テストモンスターA",
            atkValue = 10, defValue = 10, hpValue = 10
        },
        new()
        {
            rank = 0, pictureID = 1,
            monsterName = "テストモンスターB",
            atkValue = 20, defValue = 20, hpValue = 20
        },
        new()
        {
            rank = 1, pictureID = 2,
            monsterName = "テストモンスターC",
            atkValue = 20, defValue = 20, hpValue = 20
        },
        new()
        {
            rank = 1, pictureID = 2,
            monsterName = "テストモンスターC",
            atkValue = 20, defValue = 20, hpValue = 20
        },
    };

    foreach (var card in cards)
    {
        var copy = Instantiate(cardPrefab, cardsList.transform);
        copy.SetData(card);
        copy.SetSelectable(true);
    }
}

private void OnEnable()
{
    backButton.onClick.AddListener(()=>screenSlide.Hide());
    deleteButton.onClick.AddListener(DeleteSelectedCards);
}

private void OnDisable()
{
    backButton.onClick.RemoveAllListeners();
}
This is a very simple script. It clears any cards showing on the screen, and then loads some test cards. The これは非常にシンプルなスクリプトである。画面に表示されているカードをすべて消してから、テスト用のカードを読み込んでいる。「削除」button does nothing right now, and the ボタンは現時点では何もせず、「戻る」button takes us back to the top menu.ボタンはトップメニューに戻る。
ToAPIを使うには、オフラインのテストカードを置き換えて、サーバーにカードをリクエストするだけでよい。APIRequest use our API, all we have to do is replace the offline test cards and request cards from the Server. Since we already have our APIRequest method, let's use it here. メソッドはすでに用意してあるので、ここで使ってみよう。
// カードを読み込み、画面に追加し、表示する
private async Awaitable LoadCardsAsync()
{
    // すべてのカード一を削除する
    foreach (Transform child in cardsList.transform)
        Destroy(child.gameObject);

    // サーバーにカードの一覧を要求
    var cards = await APIRequest.GetPlayerCards(LoginController.UserID);

    // 1枚ずつを追加
    foreach (var item in cards.playerCards)
    {
        for (var i = 0; i < item.count; i++)
        {
            var copy = Instantiate(cardPrefab, cardsList.transform);
            copy.SetData(item.card);
            copy.SetSelectable(true);
        }
    }
}
Let's login again and try loading the player cards:もう一度ログインして、プレイヤーのカードを読み込んでみよう。
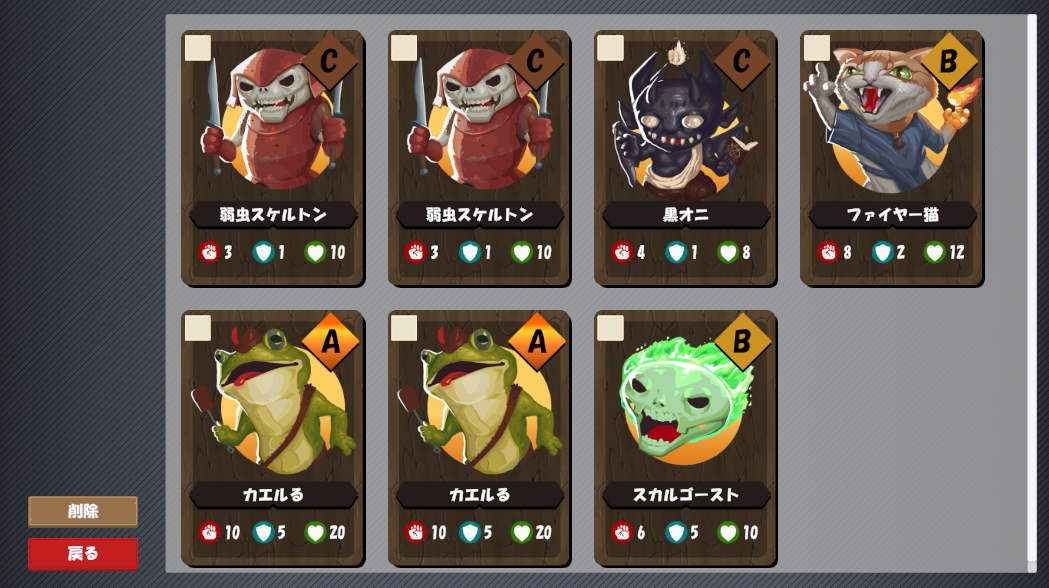
These are the cards we stored in the database!これは、データベースに保存しておいたカードである!