
ログイン
PHPでAPIを作成(固定結果)
まず、Unityから接続できるようにしたいので、サーバーでログイン API の機能を追加しましょう。データベースがまだ作成していないため、ひとまず固定の結果を返しましょう。
C:\xmpp\htdocs\api フォルダを作成しましょう。この中に本ゲームのオンライン機能を実装していくフォルダにする。その中にlogin.php というからのテキストファイルを作成してください。単純に、成功したら、ユーザーIDを返し、失敗したら -1 を返すようにしましょう:
<?php
	// JSONを返すべき
	header("Content-Type: application/json; charset=utf-8");

	// ユーザーIDを返す
	$json['user_id'] = "1";

	// 返す
	print(json_encode($json));
?>
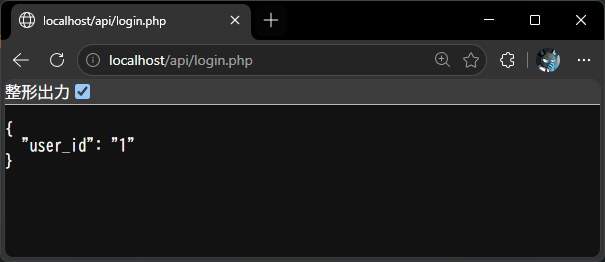
まだPOSTデータが要らないので、ブラウザーで確認できる:
Unityを使い、APIとの接続
仮で作ったログインAPIを試すため、UnityでAPI管理クラスを作ってみましょう。まず、単純に:
// サーバーに依頼するメソッドの一覧
public static class APIRequest
{
    // サーバーのAPIのURL
    private const string ServerAPI = "http://localhost/api";

    // ログイン
    public static async Awaitable LoginAsync()
    {
        // ログインAPIのURLへリクエストを送信
        const string url = ServerAPI + "/login.php";
        var webRequest = UnityWebRequest.Get(url);

        // 返事を待機する
        await webRequest.SendWebRequest();

        // 返事の文字列を取得
        var webResponse = webRequest.downloadHandler.text;

        // デバッグ用
        Debug.Log(webResponse);
    }
}
試すには、ログイン画面で、「ログイン」ボタンを押したら、上記のメソッドを使用しましょう:
// ログイン処理する
public class LoginController : MonoBehaviour
{
    // ログインボタン
    [SerializeField] private Button sendButton;

    // ログインボタンを押したとき
    private async void OnSendClicked()
    {
        // リクエストを送信し、待機する
        await APIRequest.LoginAsync();
    }

    // 有効になった時
    private void OnEnable()
    {
        sendButton.onClick.AddListener(OnSendClicked);
    }

    // 無効になった時
    private void OnDisable()
    {
        sendButton.onClick.RemoveAllListeners();
    }
}
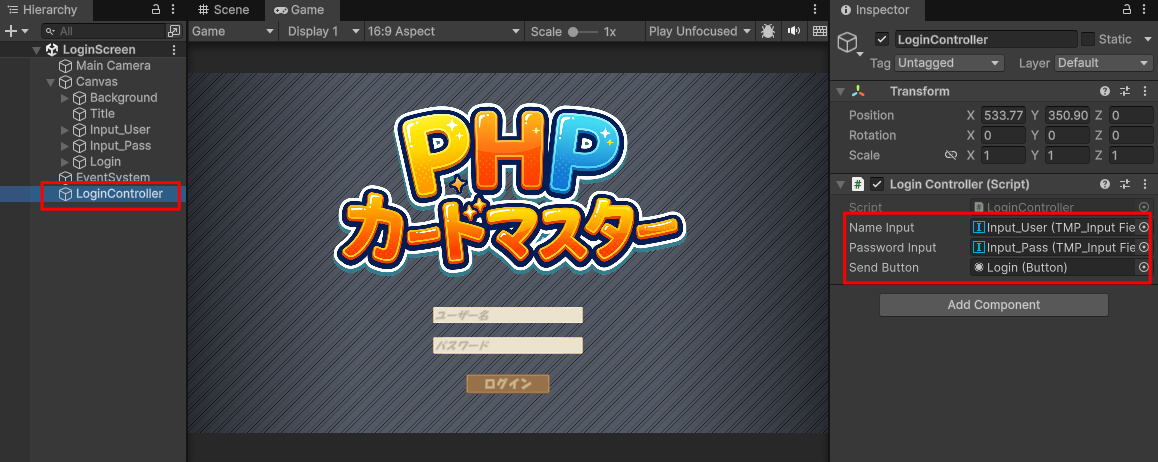
Unityでログインコントローラーを追加し、ボタンを設定する:

実行すると:
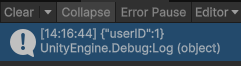
サーバーの返事を確認できた!
ポップアップを表示
次、Webサーバーから戻るJSON文字列ををJObjectへ変換し、結果により、ポップアップを表示しましょう。まず、APIRequest を編集し、成功したかどうかを返しましょう。LoginAsync は JObject を返すので、定義が変わる:
// 前:
public static async Awaitable LoginAsync()

// 後:
public static async Awaitable<JObject> LoginAsync()
すべて組みあわえると:
// サーバーに依頼するメソッドの一覧
public static class APIRequest
{
    // サーバーのAPIのURL
    private const string ServerAPI = "http://localhost/api";

    // ログイン
    // 戻り値:ログインの結果(JObject)
    public static async Awaitable<JObject> LoginAsync()
    {
        // ログインAPIのURLへリクエストを送信
        const string url = ServerAPI + "/login.php";
        var webRequest = UnityWebRequest.Get(url);

        // 返事を待機する
        await webRequest.SendWebRequest();

        // 返事の文字列を取得
        var webResponse = webRequest.downloadHandler.text;

        // デバッグ用
        Debug.Log(webResponse);

        // JSONからJObjectへ変換
        JObject response = JObject.Parse(webResponse);

        // 返す
        return response;
    }
}そして、LoginController で結果を確認し、ポップアップを表示しましょう:
// ログインボタンを押したとき
private async void OnSendClicked()
{
    // リクエストを送信し、待機する
    LoginResponse result = await APIRequest.LoginAsync();

    // 空の文字列 -> 失敗
    string userID = (string)result["user_id"];
    if (string.IsNullOrEmpty(userID))
    {
        PopupController.Show("エラー", "ログインできませんでした。");
    }
    else
    {
        PopupController.Show("成功!", "ログインできました!");
    }
}
「ログイン」ボタンを押すと
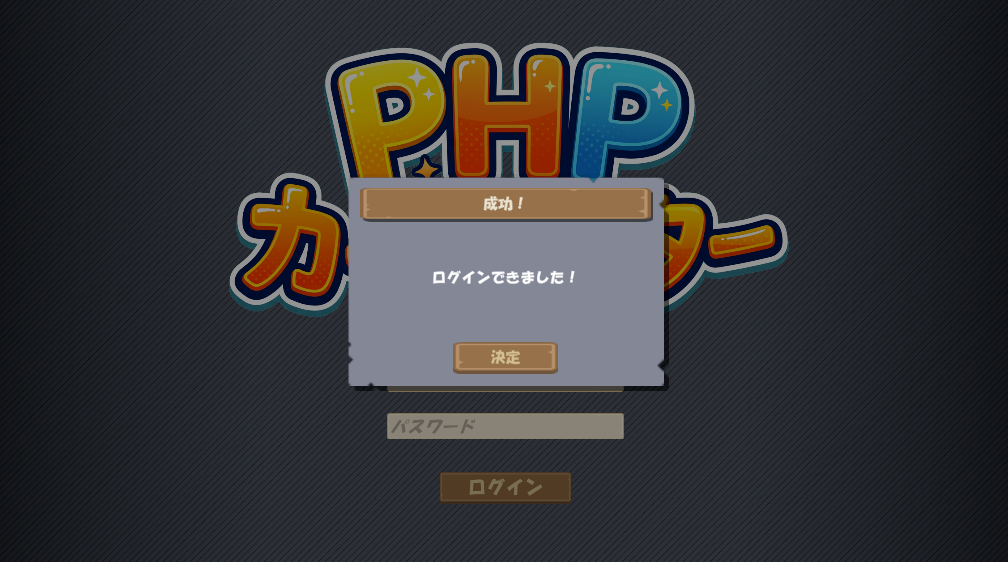
login.php で true / false を変えて、Unityで確かめてください。
PHPでAPIを作成(ifで分岐)
現在、login.php で成功するかどうかは固定しているので、if で分岐しましょう。ユーザー名とパスワードは "test" だったら、ログインは成功し、そうではない場合は失敗しましょう:
<?php
	// JSONを返すべき
	header("Content-Type: application/json; charset=utf-8");

	// 失敗を想定する
	$json['user_id'] = "";

    // ユーザー名とパスワードを確認
    $user = $_POST['user'];
    $pass = $_POST['password'];
    if ($user == "test" && $pass == "test")
    {
        $json['user_id'] = "1";
    }

	// 返す
	print(json_encode($json));
?>
このスクリプトは POST でユーザー名とパスワードを期待しているので、Unity から渡しましょう。
// ログイン
// user:ユーザー名
// password:パスワード
// 戻り値:ログインの結果(JObject)
public static async Awaitable<LoginResponse> LoginAsync(string user, string password)
{
    // POSTでデータを送るので、変数を用意する
    // サーバーが期待しているデータに合わせる
    var postData = new WWWForm();
    postData.AddField("user", user);
    postData.AddField("password", password);

    // ログインAPIのURLへリクエストを送信
    const string url = ServerAPI + "/login.php";
    var webRequest = UnityWebRequest.Post(url, postData);

    // 返事を待機する
    await webRequest.SendWebRequest();

    // 返事の文字列を取得
    var webResponse = webRequest.downloadHandler.text;

    // デバッグ用
    Debug.Log(webResponse);

    // JSONからJObjectへ変換
    JObject response = JObject.Parse(webResponse);

    // 返す
    return response;
}最後に、LoginController で画面の入力との連携すれば、出来上がり!
// ログインを処理する
public class LoginController : MonoBehaviour
{
    // ユーザー名
    [SerializeField] private TMP_InputField nameInput;

    // パスワード
    [SerializeField] private TMP_InputField passwordInput;

    // ログインボタン
    [SerializeField] private Button sendButton;

    // ログインボタンを押したとき
    private async void OnSendClicked()
    {
        // リクエストを送信し、待機する
        var name = nameInput.text;
        var pass = passwordInput.text;
        JObject result = await APIRequest.LoginAsync(name, pass);

        // 空の文字列 -> 失敗
        string userID = (string)result["user_id"];
        if (string.IsNullOrEmpty(userID))
        {
            PopupController.Show("エラー", "ログインできませんでした。");
        }
        else
        {
            PopupController.Show("成功!", "ログインできました!");
        }
    }

    // (省略)
  }
データベースを作成
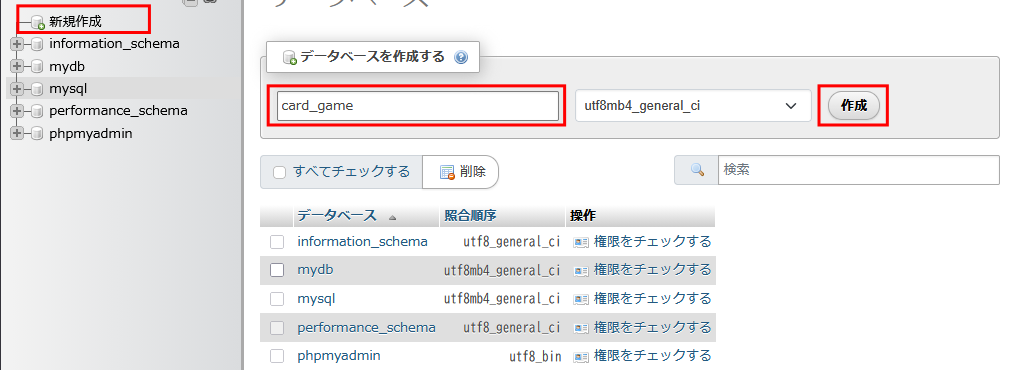
まず、カードゲーム専用の「card_game」データベースを作成しましょう:
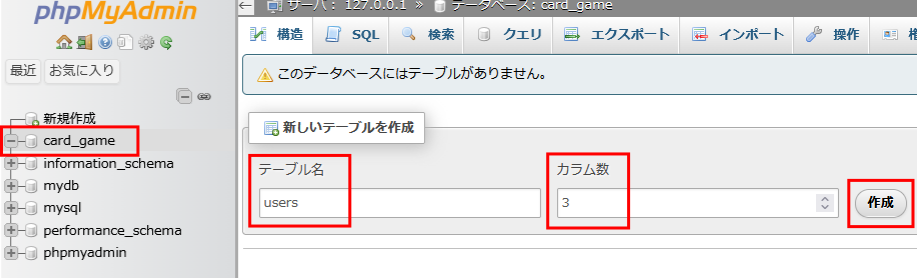
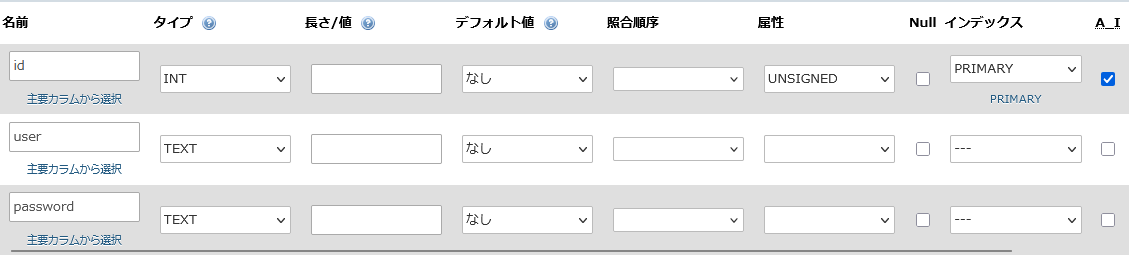
次に、ユーザーのテーブルを作成しましょう。必要なのは、ユーザーID番号、ユーザー名とパスワードなので、3のカラムで設計:
そして、いくつかのユーザーを作成してみてください

| 注意 |
|
平文(人間が読める)パスワードを保存するのは大変危険であるので、必ずソルト+ハッシュしてから保存してください。今回の練習のために平文で保存する。
パスワードセキュリティに関して、ここを読んでください。 |
PHPでAPIを作成(DBを使用)
login.php を編集し、データベースのサポートを追加しましょう。
<?php
	// JSONを返すべき
	header("Content-Type: application/json; charset=utf-8");

	// 接続
	$dbh = new PDO('mysql:host=localhost; dbname=card_game', "root", "", [PDO::ATTR_PERSISTENT => true]);

	// 失敗を想定する
	$json['user_id'] = "";

    // ユーザー名とパスワードを確認
    $user = htmlspecialchars($_POST['user']);
    $pass = htmlspecialchars($_POST['password']);

	// データベース検索
	$sql = sprintf("SELECT * FROM users WHERE user='%s' AND password='%s'", $user, $pass);
	$result = $dbh->query($sql);

	// 必ず1個を返さなきゃ
	if ($result->rowCount() == 1)
	{
		# ユーザーIDを返す
		$record = $result->fetch();
        $json['user_id'] = strval($record['id']); // 文字列として返す
	}

	// 返す
	print(json_encode($json));
?>
Unityを使い、確認してみてください。
ユーザーIDを保存、シーン遷移
ログインを成功したら、ユーザーIDを再利用できるようにし、TopMenu シーンに遷移しましょう。なお、IDはずっと変わらないので静的変数(static)として管理しても大きな問題がない。LoginController の先頭に:
// ログインを処理する
public class LoginController : MonoBehaviour
{
    // ログインしているユーザーID
    public static string UserID { get; private set; }

    // ...
}
そして、ボタンの処理では…
// ログインボタンを押したとき
private async void OnSendClicked()
{
    // リクエストを送信し、待機する
    var name = nameInput.text;
    var pass = passwordInput.text;
    JObject result = await APIRequest.LoginAsync(name, pass);

    // 空の文字列 -> 失敗
    UserID = (string)result["user_id"];
    if (string.IsNullOrEmpty(UserID))
    {
        PopupController.Show("エラー", "ログインできませんでした。");
    }
    else
    {
        //PopupController.Show("成功!", "ログインできました!");
        SceneManager.LoadScene("TopMenu");
    }
}
No comments to display
No comments to display